How to remove a steering column? Removing a steering column is a task that involves disconnecting the steering linkage, dealing with wiring, and potentially handling airbags. This guide provides a step-by-step process for the careful and safe removal of a steering column. This process may be necessary for steering column replacement, car steering column repair, or accessing other parts of your vehicle. Remember, safety is paramount. If you are not comfortable with any of these steps, seek professional help with your automotive steering column service.
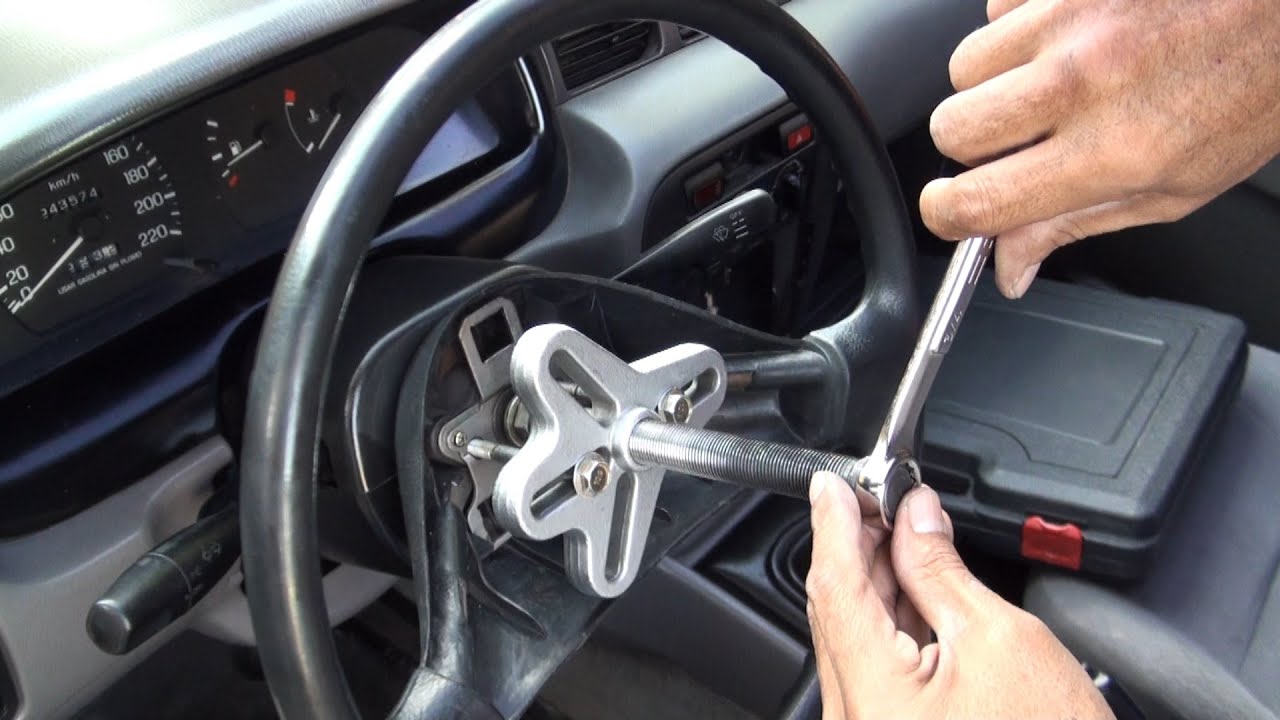
Image Source: i.ytimg.com
I. Preparing for Steering Column Removal
Before you even think about touching a wrench, preparation is key for successful steering column removal. Skipping these steps could lead to injuries or damage to your vehicle.
A. Safety First!
-
Disconnect the Battery: This is the most crucial step. Disconnect the negative terminal of your car’s battery. This prevents accidental airbag deployment and protects the electrical system. Wait at least 15-30 minutes after disconnecting the battery to allow any residual electricity to dissipate before working on the steering column. This is essential if your vehicle has a steering column airbag.
-
Consult Your Vehicle’s Repair Manual: Every vehicle is different. A repair manual specific to your car’s make, model, and year will provide detailed instructions and diagrams. These can be very useful to avoid mistakes.
-
Gather Steering Column Tools Needed: Having the right tools saves time and prevents damage. You’ll likely need:
- Socket set (metric or standard, depending on your vehicle)
- Wrenches (various sizes)
- Screwdrivers (Phillips and flathead)
- Torque wrench
- Steering wheel puller (essential for removing the steering wheel)
- Pliers
- Punch and hammer (for loosening stubborn bolts)
- Safety glasses
- Gloves
- Pen and paper (for labeling wires)
- Small storage containers (to keep track of bolts and small parts)
B. Initial Assessment and Documentation
- Observe and Note: Take a close look at the steering column and surrounding components. Note the location of wires, connectors, and fasteners.
- Take Pictures: Use your phone or a camera to take pictures of the steering column before you start disconnecting anything. These photos serve as a valuable reference during reassembly.
- Label Everything: Use masking tape and a pen to label all wires and connectors. This will prevent confusion when you put everything back together.
II. Steering Wheel Removal
Removing the steering wheel is usually the first step in steering column removal.
A. Removing the Steering Wheel Airbag (If Equipped)
WARNING: Airbags can be dangerous if not handled correctly. Always disconnect the battery and wait before proceeding.
- Locate Airbag Fasteners: These are usually screws or bolts located on the back of the steering wheel. Some vehicles have access holes.
- Disconnect the Airbag Connector: Carefully disconnect the airbag wiring harness removal. There is usually a clip or locking mechanism that needs to be released.
- Store the Airbag Safely: Place the airbag in a safe location, away from heat and static electricity, with the airbag facing upwards.
B. Removing the Steering Wheel
- Loosen the Steering Wheel Nut: Use a socket and breaker bar to loosen the large nut in the center of the steering wheel. Do not remove it completely yet.
- Use a Steering Wheel Puller: Attach the steering wheel puller to the steering wheel. Tighten the center bolt of the puller to gently pull the steering wheel off the shaft.
- Remove the Nut and Steering Wheel: Once the steering wheel is loose, remove the nut completely and carefully pull the steering wheel off the shaft.
C. Clockspring Precautions
- Clockspring: The clockspring allows the steering wheel to turn while maintaining electrical connections to the airbag, horn, and other components.
- Secure the Clockspring: Once the steering wheel is removed, the clockspring can easily unwind. Use tape to secure it in place to prevent damage. Some clocksprings have a locking mechanism.
III. Steering Column Disassembly
With the steering wheel out of the way, you can now begin disassembling the steering column itself.
A. Removing Trim and Covers
- Identify Fasteners: Look for screws or clips holding the trim pieces and covers in place.
- Remove Carefully: Use a screwdriver or trim removal tool to carefully pry off the trim pieces.
- Store the Parts: Keep all removed parts organized so they can be easily found during reassembly.
B. Disconnecting Electrical Connectors
- Identify Connectors: Locate all electrical connectors attached to the steering column.
- Disconnect Carefully: Disconnect each connector by pressing the release tab and gently pulling it apart. Never pull on the wires themselves.
- Label Everything: Double-check that all connectors are labeled before disconnecting.
C. Removing Switches and Levers
- Turn Signal Switch, Wiper Switch, Ignition Switch: These switches are usually attached to the steering column with screws or clips.
- Remove Fasteners: Remove the fasteners holding the switches in place.
- Disconnect Wiring: Disconnect any wiring connected to the switches.
- Slide or Pull Off: Carefully slide or pull the switches off the steering column.
IV. Disconnecting Steering Linkage
The steering linkage connects the steering column to the steering gear or rack and pinion. This connection needs to be disconnected before the steering column can be removed.
A. Locating the Steering Linkage
- Access Point: The steering linkage is usually located near the firewall, where the steering column passes through to the engine compartment.
- Universal Joint or Flexible Coupling: The linkage is connected to the steering column by a universal joint or a flexible coupling.
B. Disconnecting the Linkage
- Loosen or Remove Fasteners: Loosen or remove the bolts or nuts that secure the linkage to the steering column.
- Separate the Linkage: Use a punch and hammer to gently separate the linkage from the steering column shaft if necessary.
- Be Careful: Avoid damaging the linkage or the steering column shaft.
V. Final Steering Column Removal
Now that everything is disconnected, you can finally remove the steering column from the vehicle.
A. Supporting the Steering Column
- Extra Hands: Have a helper support the steering column while you remove the final fasteners. This prevents the column from falling and potentially causing damage.
- Secure with Straps: If you don’t have a helper, use straps or rope to secure the steering column to the dashboard or other parts of the vehicle.
B. Removing the Mounting Bolts
- Locate Mounting Bolts: The steering column is typically held in place by several bolts that attach it to the vehicle’s frame or dashboard support.
- Remove Bolts: Remove all the mounting bolts.
C. Lowering and Removing the Column
- Gently Lower: Carefully lower the steering column, making sure no wires or hoses are caught.
- Maneuver Out: Maneuver the steering column out of the vehicle.
VI. Inspection and Steering Column Replacement or Repair
Once the steering column is removed, it’s time to inspect it and decide on the next steps.
A. Inspecting the Steering Column
- Check for Damage: Look for any signs of damage, such as cracks, bends, or broken parts.
- Inspect Bearings and Joints: Check the bearings and joints for wear or looseness.
- Evaluate Switches and Wiring: Check the switches and wiring for damage or corrosion.
B. Steering Column Replacement
- New or Used: If the steering column is damaged beyond repair, you will need to replace it. You can use a new or used steering column.
- Compatibility: Make sure the replacement steering column is compatible with your vehicle’s make, model, and year.
- Installation: Follow the steps in reverse order to install the new steering column.
C. Car Steering Column Repair
- Minor Repairs: If the damage is minor, you may be able to repair the steering column. This could involve replacing bearings, switches, or wiring.
- Professional Help: For more complex repairs, it’s best to seek professional help from a qualified mechanic.
VII. Reassembly
Reassembly is the reverse of disassembly. Take your time, and double-check everything.
A. Reinstalling the Steering Column
- Lift and Position: Carefully lift the steering column back into place and align it with the mounting holes.
- Install Mounting Bolts: Install the mounting bolts and tighten them to the specified torque.
- Reconnect Steering Linkage: Reconnect the steering linkage and tighten the fasteners.
B. Reconnecting Electrical Connectors
- Match Connectors: Match the electrical connectors to their corresponding locations based on your labels and pictures.
- Secure Connections: Ensure all connectors are securely connected.
C. Reinstalling Switches and Trim
- Slide or Push Into Place: Slide or push the switches back into place.
- Secure with Fasteners: Secure the switches with their fasteners.
- Reinstall Trim: Reinstall the trim pieces and covers.
D. Reinstalling the Steering Wheel
- Align the Steering Wheel: Align the steering wheel with the steering column shaft.
- Install the Nut: Install the steering wheel nut and tighten it to the specified torque.
- Reconnect the Airbag (If Equipped): Reconnect the airbag wiring harness.
- Reinstall the Airbag: Reinstall the airbag and secure it with the fasteners.
E. Final Checks
- Reconnect Battery: Reconnect the negative terminal of the battery.
- Test Steering: Start the engine and test the steering. Make sure the steering wheel is centered and that the steering operates smoothly.
- Test Switches: Test all the switches, including the turn signals, wipers, and horn.
- Check for Airbag Warning Lights: If your vehicle has an airbag, make sure the airbag warning light is not illuminated. If it is, there may be a problem with the airbag system.
VIII. Troubleshooting
Even with careful preparation, problems can arise during steering column removal. Here are some common issues and their solutions:
| Problem | Possible Cause(s) | Solution(s) |
|---|---|---|
| Steering wheel won’t come off | Steering wheel puller not used correctly | Double-check puller attachment; ensure even pressure; try penetrating oil. |
| Electrical connectors won’t disconnect | Corrosion or damage to connector | Use electrical contact cleaner; gently wiggle the connector; inspect for broken tabs; replace connector. |
| Steering linkage stuck | Rust or corrosion | Apply penetrating oil; use a punch and hammer to gently separate the linkage. |
| Airbag warning light is on | Airbag connector not properly connected | Double-check connector; consult a mechanic to reset the system. |
IX. Automotive Steering Column Service: When to Seek Professional Help
While this guide provides a detailed overview of steering column removal, some situations warrant professional assistance.
- Airbag System Concerns: If you are uncomfortable working with the airbag system, it is best to seek professional help. Incorrect handling of airbags can be dangerous.
- Complex Electrical Issues: If you encounter complex electrical issues, such as damaged wiring or malfunctioning sensors, a qualified mechanic can diagnose and repair the problem.
- Steering System Malfunctions: If you suspect there is a problem with the steering system, such as excessive play or binding, it is best to have it inspected by a professional.
X. Frequently Asked Questions (FAQ)
- What is the purpose of a steering column?
- The steering column connects the steering wheel to the steering gear, allowing the driver to control the direction of the vehicle.
- Can I remove a steering column myself?
- Yes, with the right tools and knowledge, you can remove a steering column yourself. However, safety is paramount. If you are uncomfortable with any of the steps, seek professional help.
- Who is responsible for steering column safety?
- The vehicle manufacturer is responsible for the initial design and safety of the steering column. Aftermarket modifications or repairs are the responsibility of the installer or repairer.
- What are the signs of a bad steering column?
- Signs of a bad steering column include excessive play, binding, noise, or difficulty steering.
- Is steering column replacement a difficult task?
- Steering column replacement can be challenging, especially for those without experience. It requires careful attention to detail and a good understanding of automotive systems.
- How long does it take to remove a steering column?
- The time it takes to remove a steering column can vary depending on the vehicle and your experience level. It typically takes 2-4 hours.
- What are the common causes of steering column failure?
- Common causes of steering column failure include wear and tear, impact damage, and corrosion.
- What is the cost of steering column repair?
- The cost of steering column repair can vary depending on the extent of the damage and the cost of parts.
By following these steps and taking the necessary precautions, you can safely and successfully remove a steering column. Remember to consult your vehicle’s repair manual and seek professional help when needed.
Hi, I’m Sean Kernan, the voice behind esteeringwheel.com.. With a passion for all things automotive, I created this platform to share my journey, insights, and expertise about cars. From the latest tech to timeless driving tips, my goal is to help fellow enthusiasts and everyday drivers navigate the fascinating world of automobiles. Welcome to my corner of the road—let’s steer toward knowledge and discovery together!