A power steering belt is a crucial component of your vehicle, responsible for transferring power from the engine to the power steering pump. Can I replace a power steering belt myself? Yes, you can. With the right tools and a little know-how, power steering belt replacement is a manageable automotive repair DIY project. This comprehensive guide will walk you through the entire process, from diagnosing a worn belt to properly installing a new one. This article will cover serpentine belt installation and how to tighten power steering belt to eliminate power steering belt squeal.
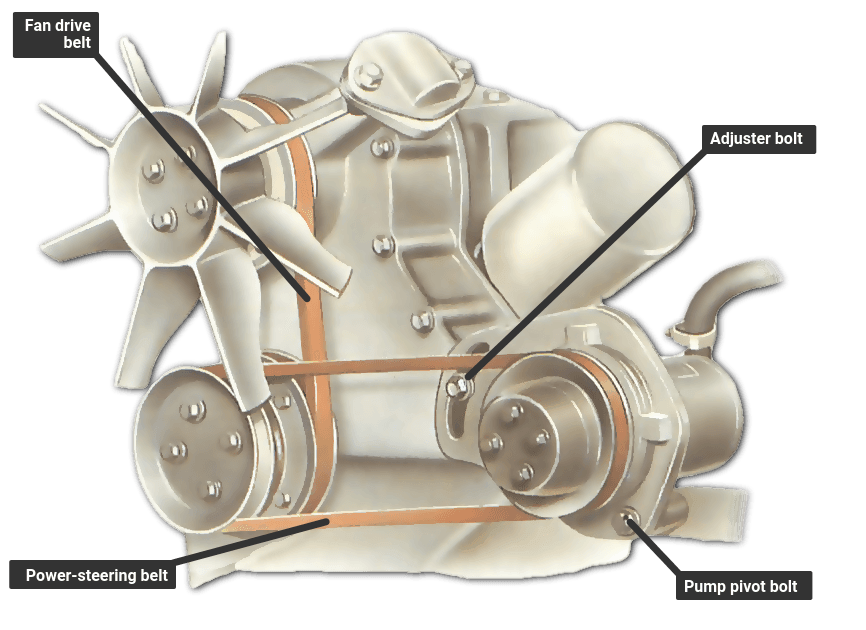
Image Source: www.howacarworks.com
Recognizing When Your Power Steering Belt Needs Replacement
Before diving into the installation process, it’s crucial to identify if your power steering belt actually needs replacing. Ignoring the signs of a worn power steering belt can lead to steering problems and even damage to other engine components.
Key Signs of a Worn Power Steering Belt
- Power Steering Belt Squeal: A high-pitched squealing noise, especially when turning the steering wheel at low speeds, is a common indicator. This is often caused by a slipping belt.
- Cracks and Damage: Visually inspect the belt for cracks, fraying, or missing chunks. Any visible damage warrants immediate replacement.
- Glazed Appearance: A shiny, smooth surface on the belt indicates that it’s hardened and no longer gripping properly.
- Difficulty Steering: If you notice increased effort required to turn the steering wheel, especially at low speeds, it could be a sign that the power steering pump isn’t receiving enough power due to a slipping or worn belt.
- Loose Belt: Excessive slack in the belt can cause it to slip and fail to properly drive the power steering pump.
Visual Inspection is Key
Take a close look at your power steering belt. If you see any of the problems mentioned above, it’s time for a replacement.
Gathering Your Tools and Supplies
Having the right tools makes the power steering belt replacement process much smoother and safer. Here’s a list of what you’ll need:
- New Power Steering Belt: Make sure you get the correct belt for your vehicle’s make, model, and year.
- Belt Tensioner Tool: This specialized tool is designed to relieve tension on the belt tensioner, allowing you to easily remove and install the belt.
- Socket Set and Wrench Set: You’ll need these to loosen and tighten bolts on the belt tensioner and other components.
- Screwdrivers (Flathead and Phillips): These may be needed to remove any plastic covers or shields obstructing access to the belt.
- Gloves: Protect your hands from dirt and grease.
- Safety Glasses: Protect your eyes from debris.
- Pen and Paper (or Phone): For sketching the belt routing diagram before removal.
- Work Light: Good lighting is essential for seeing what you’re doing.
- Jack and Jack Stands (Optional): If access to the belt is difficult from above, you may need to jack up the vehicle for better visibility.
- Shop Rags: For cleaning up any spills or grease.
Preparing for the Power Steering Belt Replacement
Safety is paramount when working on your vehicle. Follow these precautions before starting:
- Park on a Level Surface: Ensure your vehicle is parked on a flat, stable surface.
- Engage the Parking Brake: Firmly engage the parking brake to prevent the vehicle from rolling.
- Chock the Wheels: Use wheel chocks behind the rear wheels for added safety.
- Disconnect the Negative Battery Terminal: This prevents accidental electrical shocks. Use a wrench to loosen the nut on the negative terminal and carefully remove the cable.
- Locate the Power Steering Belt: Identify the power steering belt and the components it drives, including the power steering pump.
Step-by-Step: Power Steering Belt Replacement
Now, let’s get to the actual replacement process. Follow these steps carefully for a successful power steering belt installation.
Step 1: Sketch the Belt Routing Diagram
Before removing the old belt, create a belt routing diagram. This is critical for ensuring you install the new belt correctly.
- Carefully Observe the Belt’s Path: Trace the path of the belt around all the pulleys it contacts.
- Draw a Diagram: Use a pen and paper (or your phone) to sketch the belt routing diagram. Note the position of the belt tensioner and any other relevant components. Take a picture for reference.
- Double-Check Your Diagram: Make sure your diagram accurately reflects the belt’s path.
Step 2: Relieving Belt Tension
The belt tensioner applies pressure to the belt, keeping it tight. You need to relieve this tension to remove the old belt.
- Locate the Belt Tensioner: Identify the belt tensioner. It’s usually a spring-loaded pulley.
- Use the Belt Tensioner Tool: Insert the belt tensioner tool into the square opening on the tensioner arm.
- Apply Pressure: Using the tool, rotate the tensioner arm to relieve tension on the belt.
- Hold the Tensioner: Keep the tensioner arm in the relieved position.
Step 3: Removing the Old Power Steering Belt
With the tension relieved, you can now remove the old belt.
- Slip the Belt Off: Carefully slip the belt off one of the pulleys, such as the alternator or power steering pump pulley.
- Remove the Belt Completely: Once you’ve freed the belt from one pulley, you can easily remove it from the remaining pulleys.
- Inspect the Old Belt: Examine the old belt for wear, cracks, or other damage. This can give you clues about potential issues with the pulleys or tensioner.
Step 4: Installing the New Power Steering Belt
Now, it’s time to install the new belt, following the belt routing diagram you created earlier.
- Refer to Your Diagram: Keep your belt routing diagram handy.
- Route the Belt: Start by routing the new belt around one of the pulleys, such as the crankshaft pulley.
- Follow the Diagram: Carefully follow your diagram, routing the belt around each pulley in the correct order.
- Leave the Tensioner Pulley for Last: Keep the tensioner pulley for last, as you’ll need to relieve tension again to slip the belt onto it.
- Ensure Proper Placement: Make sure the belt is seated properly in the grooves of each pulley. A misaligned belt can quickly wear out or slip off.
Step 5: Releasing the Belt Tensioner
With the new belt in place, you can now release the belt tensioner.
- Use the Belt Tensioner Tool: Insert the belt tensioner tool into the square opening on the tensioner arm again.
- Relieve Tension: Rotate the tensioner arm to relieve tension on the belt.
- Slip the Belt onto the Tensioner Pulley: Carefully slip the belt onto the tensioner pulley.
- Slowly Release the Tensioner: Slowly release the tensioner arm, allowing it to apply tension to the new belt.
Step 6: Verifying Belt Alignment and Tension
After installing the new belt, it’s crucial to verify that it’s properly aligned and has the correct tension.
- Visual Inspection: Visually inspect the belt to ensure it’s properly seated in the grooves of all pulleys.
- Check Alignment: Make sure the belt is running straight and not rubbing against any components.
- Tension Check: Check the belt tension. It should feel firm, but not overly tight. You should be able to deflect the belt slightly between the longest span of pulleys. Too much or too little tension can cause problems.
- Use a Belt Tension Gauge (Optional): For more accurate tension measurement, you can use a belt tension gauge. Refer to your vehicle’s service manual for the correct tension specification.
Step 7: Starting the Engine and Checking for Issues
Before wrapping up, start the engine and check for any issues.
- Reconnect the Negative Battery Terminal: Reconnect the negative battery terminal.
- Start the Engine: Start the engine and let it idle for a few minutes.
- Listen for Noises: Listen for any unusual noises, such as squealing or grinding.
- Check Steering: Turn the steering wheel from lock to lock and ensure the power steering is working smoothly.
- Inspect the Belt: Visually inspect the belt again while the engine is running to ensure it’s running smoothly and not wobbling or slipping.
- Turn off the engine: If everything seems normal, turn off the engine and remove the key.
Step 8: Final Touches
Complete these final steps to finish the job.
- Replace Any Covers or Shields: Reinstall any plastic covers or shields you removed earlier.
- Clean Up: Clean up any tools or materials you used.
- Test Drive: Take your vehicle for a short test drive to ensure the power steering is working properly.
Tips for a Smooth Power Steering Belt Replacement
- Consult Your Vehicle’s Service Manual: Your vehicle’s service manual provides specific instructions and torque specifications for your make and model.
- Use Quality Parts: Invest in a high-quality power steering belt from a reputable brand.
- Don’t Overtighten the Belt: Overtightening the belt can damage the power steering pump and other components.
- Check the Pulley Condition: While you have the belt off, inspect the pulleys for any damage or wear.
- Replace the Belt Tensioner (If Necessary): If the belt tensioner is worn or damaged, replace it along with the belt.
Deciphering Belt Routing Diagrams
A belt routing diagram is a visual representation of how the serpentine belt (which may or may not include the power steering) should be positioned around the various pulleys in your engine. These diagrams are essential for correctly installing a new belt.
Where to Find Belt Routing Diagrams
- Under the Hood: Many vehicles have a belt routing diagram sticker located under the hood.
- Vehicle Service Manual: Your vehicle’s service manual will contain a detailed belt routing diagram.
- Online Resources: You can find belt routing diagrams online by searching for your vehicle’s make, model, and year.
Interpreting a Belt Routing Diagram
Belt routing diagrams typically show the following:
- Pulleys: Each pulley is represented by a circle or oval.
- Belt Path: The line indicating the belt’s path shows how the belt should be routed around each pulley.
- Component Labels: Each pulley is labeled with the name of the component it drives (e.g., crankshaft, alternator, power steering pump).
- Tensioner Location: The belt tensioner is usually indicated with a special symbol or label.
- Direction of Rotation: Some diagrams may indicate the direction of rotation for each pulley.
Fathoming Power Steering Belt Tension
Proper belt tension is crucial for the power steering system to operate correctly. Too little tension can cause the belt to slip, leading to poor steering performance and noise. Too much tension can damage the power steering pump and other components.
How to Tighten Power Steering Belt
Most modern vehicles use an automatic belt tensioner, which maintains the correct belt tension. However, some older vehicles may have an adjustable tensioner. If your vehicle has an adjustable tensioner, follow these steps to tighten the belt:
- Locate the Adjustment Bolts: Identify the adjustment bolts on the tensioner.
- Loosen the Lock Nut: Loosen the lock nut on the adjustment bolt.
- Tighten the Adjustment Bolt: Tighten the adjustment bolt to increase belt tension.
- Check Belt Tension: Use a belt tension gauge to verify the tension.
- Tighten the Lock Nut: Once the correct tension is achieved, tighten the lock nut to secure the adjustment bolt.
Automatic Belt Tensioners
If your vehicle has an automatic belt tensioner, it’s designed to maintain the correct belt tension automatically. You typically don’t need to adjust it. If the belt is slipping, the tensioner may be faulty and need replacement.
Power Steering Belt Squeal: Diagnosing and Fixing the Issue
Power steering belt squeal is a common problem that can be caused by several factors.
Common Causes of Belt Squeal
- Worn or Damaged Belt: A worn or damaged belt is the most common cause of squealing.
- Loose Belt: A loose belt can slip and squeal, especially when turning the steering wheel.
- Contamination: Oil, coolant, or other fluids on the belt can cause it to slip and squeal.
- Misaligned Pulleys: Misaligned pulleys can cause the belt to rub and squeal.
- Worn Tensioner: A worn tensioner can fail to maintain proper belt tension, leading to squealing.
- Failing Power Steering Pump: In rare cases, a failing power steering pump can cause excessive drag on the belt, leading to squealing.
How to Stop Power Steering Belt Squeal
- Inspect the Belt: Check the belt for wear, cracks, or other damage. Replace if necessary.
- Check Belt Tension: Ensure the belt has the correct tension. Adjust or replace the tensioner if necessary.
- Clean the Belt: Clean the belt and pulleys with a degreaser to remove any oil or contaminants.
- Check Pulley Alignment: Use a straightedge to check the alignment of the pulleys.
- Consider Belt Dressing (Use Sparingly): Belt dressing can temporarily stop squealing, but it’s not a long-term solution. It can also attract dirt and grime, making the problem worse. Use sparingly and only as a temporary fix.
FAQs: Installing a Power Steering Belt
- What is a power steering belt? A power steering belt is a belt that transfers power from the engine to the power steering pump, enabling power-assisted steering.
- How often should I replace my power steering belt? Generally, a power steering belt should be replaced every 50,000 to 75,000 miles, or sooner if you notice signs of wear. Check your owner’s manual for specific recommendations.
- Can I drive with a broken power steering belt? Yes, but it will be much harder to steer the vehicle, especially at low speeds. It’s best to replace the belt as soon as possible.
- What happens if my power steering belt breaks? If your power steering belt breaks, you’ll lose power steering, making the vehicle harder to steer.
- Who is responsible for my power steering belt replacement? You, the vehicle owner, are responsible. You can either do it yourself using this guide or take it to a mechanic.
Conclusion
Tackle that squeaky or worn power steering belt yourself and reap the rewards of both savings and satisfaction! This detailed guide, coupled with careful preparation, will empower you to swap out your old belt for a new one, ensuring your steering remains fluid and your car happy. Always put safety first, and don’t forget to peek at your car’s service manual for precise steps and tightening specs. Keeping your ride in tip-top shape through routine care is the secret to a long-lasting vehicle. You’ve just learned the ropes of power steering belt installation and adjustment – go forth and conquer your DIY automotive adventure!
Hi, I’m Sean Kernan, the voice behind esteeringwheel.com.. With a passion for all things automotive, I created this platform to share my journey, insights, and expertise about cars. From the latest tech to timeless driving tips, my goal is to help fellow enthusiasts and everyday drivers navigate the fascinating world of automobiles. Welcome to my corner of the road—let’s steer toward knowledge and discovery together!